Our app prod.ly recently got the ability to award achievements to users for a variety of activities. Now, achievements have little impact if you cannot translate those into a rush of dopamine for the winning user. To achieve that, we are planning to have a pop up show as soon as the achievement is awarded, congratulating the user.
From psychology we know that if something is colourful and has animation it has a larger emotional impact than something that is static and B/W. One ingredient that is often used to heighten the effect are what I call “Hero Rays”. In this tutorial I am showing how I achieved them.
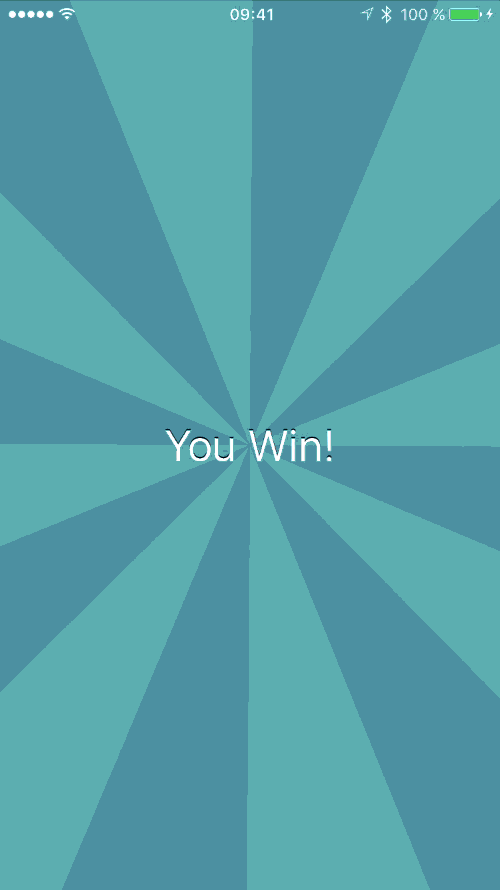
Hero Rays are arc slices emanating from a central point. They are displayed on a colored back and should be slowly rotating clockwise for extra effect. Here’s a gif I made of the final result. Note that this look is solely for the purpose of this sample.
I had the first version of this ready after about one hour. I was using a CAShapeLayer with the rays being built from individual arc slices. The core function is the one to build these rays.
func raysPath()->UIBezierPath
{
    let center = CGPoint(x: CGRectGetMidX(self.bounds),
                         y: CGRectGetMidY(self.bounds))
    let radius = sqrt(center.x * center.x + center.y * center.y)
    let numberOfSlices = 16
    let raysPath = UIBezierPath()
    let oneRayRadians = (2.0 * CGFloat(M_PI)) / CGFloat(numberOfSlices)

    for var i=0; i < numberOfSlices; i++
    {
        // skip every second slice, for background to show
        if i%2 != 0
        {
            continue;
        }

        // make one slice
        let ray = UIBezierPath(arcCenter: center,
            radius: radius,
            startAngle: CGFloat(i)*oneRayRadians,
            endAngle: CGFloat(i+1)*oneRayRadians,
            clockwise: true)
        ray.addLineToPoint(center)
        ray.closePath()

        // add all slices to the main path
        raysPath.appendPath(ray)
    }

    return raysPath
} |
Can you spot the use of Phytagoras? This I did so that the radius of the slices would always be sufficiently large as to cover the view, even if it is of rectangular shape. Every slice is achieved by following an arc segment along the radius, adding a line to the center and then closing the sub path. Every other slice is left out so that the background – in secondary color – can be visible.
Of course a custom view like this should be @IBDesignable so that it can be rendered in Interface Builder, as well as have some @IBInspectable properties so that you could quickly adjust the colors in the storyboard. I decided on being able to set a stroke color and ray color on top of the view’s background color which is inspectable by default.

On more than one occasion I found that you have to add copious amounts of if let checks to avoid the IB agent from crashing while updating the component. Supporting live rendering in Interface Builder seems to force you to be even more defensive in your Swift code.
Animated Conversation
There are three methods how you can get the rays to be rotating:
- NSTimer
- CADisplayLink
- CAAnimation
I came up with the first one of these by myself, but when I showed off my work on Twitter I was quickly informed that NSTimer is bad for driving animations because it might get deployed or misaligned with the device frame rate causing missing frames and thus small jumps in the ray rotation.
CADisplayLink can be configured to drive your animation on every frame of the device. Indeed, the animation did feel much smoother in Simulator when I tried it. With both kinds of timing ticks I simply rotated the shape layer around the z axis – the one that sticks out of the screen – by 0.01 radians.
But the most unique suggestion came from Philippe Converset, and it ended up the way I did it:
For an infinite rotation, use CABasicAnimation on transform.rotation.z form 0 to 2*M_PI with INFINITY repeatCount.
I am starting the rotation animation as soon as the view is added to a superview and I am stopping it – to be safe – as soon as it is removed.
override public func willMoveToSuperview(newSuperview: UIView?)
{
    super.willMoveToSuperview(newSuperview)

    // animate while visible
    if let _ = newSuperview
    {
        startAnimating()
    }
    else
    {
        stopAnimating()
    }
} |
The referenced animation functions are:
func startAnimating()
{
    let anim = CABasicAnimation()
    anim.keyPath = "transform.rotation.z"
    anim.toValue = CGFloat(2.0 * M_PI)
    anim.duration = 12 // seconds per rotation
    anim.repeatCount = Float.infinity

    raysView.layer.addAnimation(anim, forKey: "rotate")
}

func stopAnimating()
{
    raysView.layer.removeAllAnimations()
} |
By comparison, the variant using a CABasicAnimation is the one with the least code and this is why I prefer it. My instinct tells me that the system should be smart enough to drop frames – if it gets too busy to render at 60 FPS – to still preserve the feeling of the same rotation speed.
Layer Abandon
I was quite happy with the result so far, but it was not perfect. In particular the frame of the containing HeroRaysView animated at a different speed than the center of the rays if the size changed. There is no way how you can synchronise CALayer animations with those done by UIKit.
So I ended up replacing the CAShapeLayer with a regular UIView that has the drawing of the rays bezier path in its drawRect. This way I can adjust the size of the sub view in perfect harmony with the outer view that clipsToBounds. On the animated GIF below you can see how the center of the rays visually remains at he same spot behind the text label.

Another method that might also have worked would have been to wrap the CAShapeLayer into a UIView by means of setting it’s layerClass. But the method I chose resulted in simpler code, which is why I preferred it.
Conclusion
We have achieved Hero Rays! The sample code for this tutorial is on my Swift Examples repo on GitHub. The public part is the HeroRaysView.swift, the drawing of the rays ended up in HeroRaysDiscView.swift. I think you will agree that the result is beautiful and – most importantly to us engineers – the final code is beautiful and simple, too.
Categories: Recipes