Since the official Parse shutdown, many people are looking for alternatives. Google established Firebase as one such option for your web-based backend. In this tutorial we will be exploring how to build an iOS app that uses Google Firebase as backend.
My name is Bernhard Götzendorfer and I’m currently interning at Cocoanetics. I’ve spend some time working with Google’s Firebase and since I wanted to start blogging, I will take this opportunity and walk you through the steps to create a simple iOS App using Firebase.
This is how our finished tutorial app will look like:

Setting up the Firebase App
First we will create a new app project with Xcode and then we will configure Firebase to support it.
-
Create new Project -> Name: Firebase, choose your country and Create Project.
-
Go to your Xcode Project and copy the app’s Bundle Identifier


-
Back in Firebase click Add Firebase to an iOS Project and paste your identifier into the field named iOS-Bunde-ID, optionally you may insert an app-nickname/appstore-ID.
Then click Add App. This will generate a GoogleService-Info.plist which downloads.
- Add this file to your Xcode project right next to the Info.plist. Make sure to check the Copy if needed option.
Installing the Firebase Cocoapod
- Open your Terminal, navigate to the project location. One quick way to do that is to enter cd and then drag the project folder onto the terminal window.
- Create a new Podfile by typing pod init.
There are several text editors available in terminal, for this example we are using vi to edit the Podfile.
- Open the Podfile with the command vi Podfile.
- Move the cursor to the line below # Pods for FirebaseDemo.
- Press i to activate insert mode and type pod ‘Firebase/Database’
- press ESC to leave insert mode.
- To Exit type :wq to Write and Quit.

- Type in your Terminal “pod install” to install the pod and generate a workspace for Xcode.

Note: You need to close your Xcode project and instead open the newly generated xcworkspace.
Otherwise you won’t be able to compile because only the work space has the necessary pod references.
Firebase Code Setup
In AppDelegate.swift, we add an import for the Firebase module and call to the configure function within didFinishLaunchingWithOptions as shown below.

Firebase Authentication Rules
As the last step for configuring Firebase we need to modify the authentication rules in the Firebase console. If you still see the Add Firebase to my iOS-App popup, then close that by clicking on the X.
Click on the Database tab on the left side and click on Rules at the top. Modify the rules to look like shown in the screenshot below:

For this tutorial we will not need any more elaborate authentication, so we just make read access public. For more information about this refer to https://firebase.google.com/docs/database/security/quickstart.
Firebase setup is now complete!
Building the Messaging App
With Firebase setup now complete, we can proceed with creating our tutorial app to send messages between users.
- Delete ViewController.swift – move to Trash.
-
Right-click on the FirebaseDemo folder in project navigator and select New File.
-
Create a Cocoa Touch Class – Subclass of UIViewController named AddViewController.
-
Repeat that step but with Subclass of UITableViewController named MessageTableViewController.
-
And our last one: Choose Swift File and name it Message.
Xcode will append .swift to all these new files. Your file structure should look like this:

Go to your Main.storyboard and delete your current view controller. We will use our own custom messages table view controller as the initial view controller of the storyboard.

-
Select the new Table View Controller and in the Menu Bar at the top select Editor -> Embed in -> Navigation Controller. This creates a new navigation controller that has the table view controller as root.
-
In the attribute inspector for the new navigation controller, check “Is Initial View Controller” – this is our App’s starting point.
-
Search on for a Bar Button Item on the bottom right and insert it at the top right of the navigation bar on the table view controller. Change the System Item to Add.
-
Drag a new View Controller onto the canvas.
-
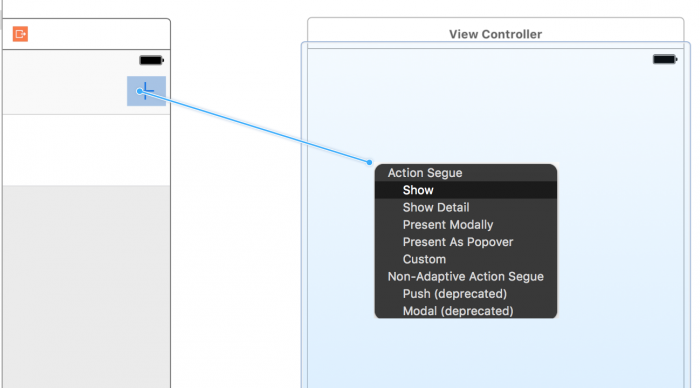
Control+drag the plus button to the view controller and select the Show option in the popup.


-
Select the table view controller – Go to the identity inspector (third tab from the left) and enter MessageTableViewController for its Custom Class.
-
Repeat the same action for the view controller but enter AddViewController for the Custom Class. This makes storyboard use our custom classes instead of the standard system ones.


-
Change the Style of the MessageTableViewController’s prototype cell to Subtitle and specify “Cell” as its identifier.
-
Add a Vertical Stack view and bind it to the View with Constraints at top, left and right.
-
Increase the Spacing from 0 to 20.


Into the Stack View add in that order:
- Label
- TextField
- Label
- Picker View
- Button
Make sure that you add all of them into the Stack View! The view controller should look like this:

Now we need outlets for the text field and picker and an action for the Send button. Show the assistant inspector via the button with the two circles and control+drag from the elements onto the code pane. For the text field choose an outlet. For the Picker as well. For the button change the Connection type to Action. I named them messageField, recipientPicker and sendMessage.
For simplicity the data source for the recipient picker will be merely a static array of names.

We make the view controller the delegate and datasource for the picker view. Control-drag from the picker onto the icon representing the view controller at the top.

Okay, thats it for setting up the user interface.
Interacting with Firebase
You can find the code for my sample project on GitHub. I will not reproduce all of the code in the project in this blog post, only two parts as they show how to talk to Firebase from Swift.
Communicating with Firebase requires a bit unusual syntax, but it is very simple. This is how a new message is sent in AddViewController.swift:
func msg(to user: String, withText msg: String)
{
   //Build the Connection to the Firebase Database
   let firebaseRef = FIRDatabase.database().reference()

   //Tell Firebase the structure
   let msgDict = ["recipient": user, "msg": msg]

   //Tell Firebase where to save and save the Value
   firebaseRef.child("Messages").childByAutoId().setValue(msgDict)
}
This gets a reference to the database and then tells it to add a new child object with an automatic identifier. The necessary fields get inferred from the dictionary. This is quite similar to Parse.
To have the messages table view be automatically be updated by firebase can tell it to send us notifications whenever something changes. The following function launches an observation where every time a new object is added our handler closure will be called.
func observeMessages(withHandler handler: @escaping (_ Message: Message) -> ())
{
   FIRDatabase.database().reference().child("Messages").queryOrderedByKey().
      observe(.childAdded, with: { (snapshot) in

         let dict = snapshot.value as! NSDictionary

         guard let to = dict["recipient"] as? String,
               let msg = dict["msg"] as? String else
         {
            print("Error in msg")
            return
         }

         let msgObj = Message(to: to, msg: msg)

         handler(msgObj)
      })
}
The establishes an ongoing query for the Messages entity. In the table view’s viewDidLoad we give it a handler to be called for each new message.
override func viewDidLoad()
{
   super.viewDidLoad()

   // Needed to load the Data with observerMessages and put it into our Array.
   // messages and later into the TableViewController
   observeMessages { (message) in

      self.messages.insert(message, at: 0)
      self.tableView.reloadData()
   }
}
I encourage you to try to understand the contents of Message.swift, MessageTableViewController and AddViewController and how they interact with each other.
Conclusion
I had great fun creating this tutorial and trying it out with several of my friends. I found that when you are explaining a concept that is new to yourself, it helps to put yourself into the frame of mind of somebody who needs to explain it to somebody else.
Google Firebase is still a bit of a mystery to me, but it looks like I made the first successful steps in using its powers for my own apps. However, the main benefit for me personally was that I got much better at creating the basics of a new iOS app, like setting up Xcode, adding CocoaPods, modifying the storyboard in Interface Builder and much more.
I welcome your feedback. You can either send me an mail or create an issue on GitHub. Special thanks to Oliver for motivating and mentoring me, my teachers for giving me a good start into programming and all the people which follow the same path as I do and are a part of my life.
Categories: Recipes
Nice work.
There is a typo in the instructions for creating the class AddViewController. You meant to subclass UIViewController, not ViewController.
Sorry, just noticed the next class definition for MessageTableViewController. I’m sure you meant UITableViewController as the superclass. Easy enough to catch but someone really new to Swift coding might get caught up in errors with these two instructions.
– Steve